BLOG

4 Steps to Backup Phone Photos
4 Steps to Backup Phone Photos
Try this method next time you’re sick of looking at your disorganized phone photos app and in 4 steps to backup phone photos, you’ll have Marie Condo asking for your advice!
In this post, I’m going to show you how to organize and store your phone photos so you can free up that precious phone memory. We’ll go over how to bulk delete, organize into folders, and where to store them for safekeeping. To view the information in a video instead, be sure you check out my YouTube video!
Step 1: Delete Unwanted Photos
The first step is to delete any photos you don’t want. This includes duplicates, blurry photos, screenshots and anything you took for temporary reasons, like receipts or street signs. The easiest way to delete duplicates is to use your phone's 'delete duplicates' feature. Inside your photos app, scroll down until you see Utilities section to find the 'delete duplicates' feature.
Step 2: Organize Photos into Albums by Event
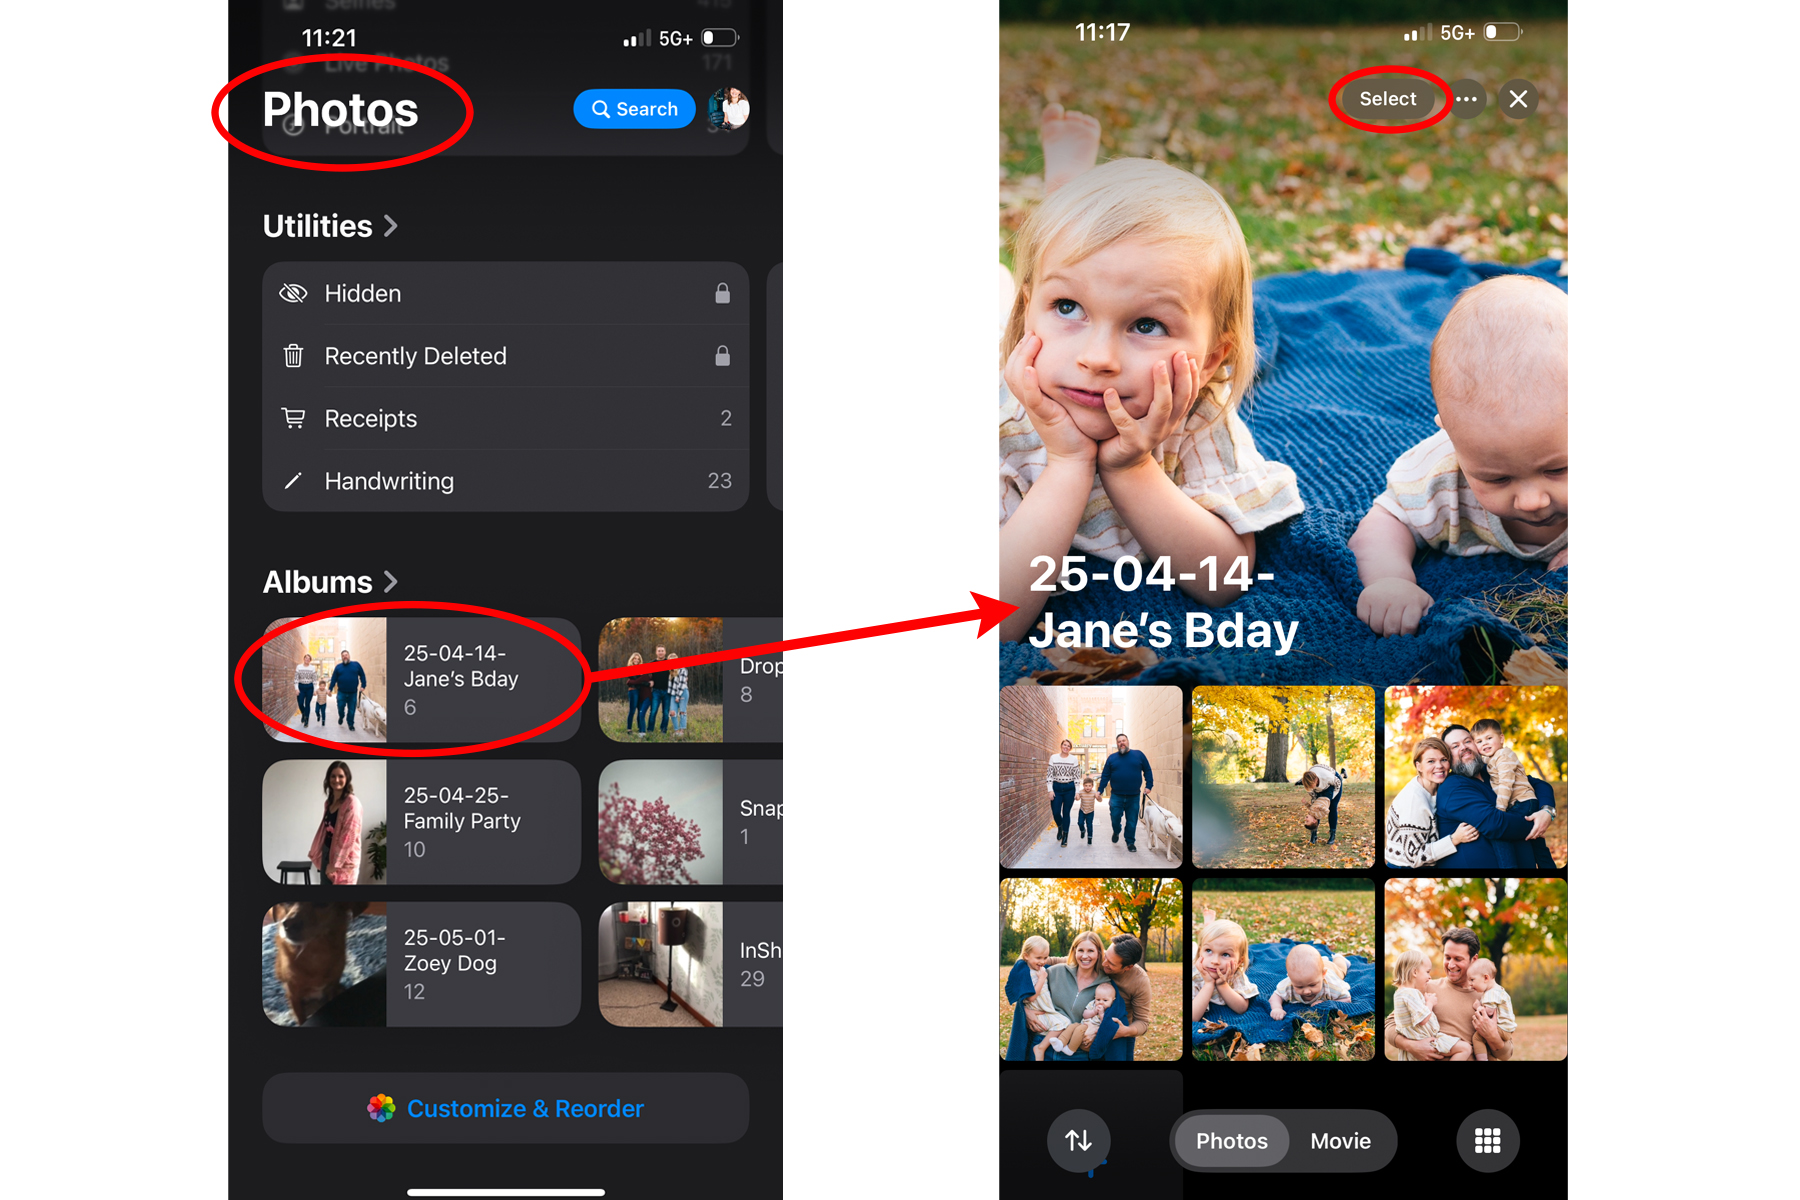
Next, organize your photos into albums by events. Your phone automatically organizes by date, so making albums for 'Jonny's first birthday' or 'Trip to Yellowstone' will be helpful for finding the photos later. A good rule of thumb is to include the date in these album titles so when you search, you have more than one way to find each folder.
Pro Tip: Label each folder like this: year-month-day-Name of event. Consistency in folder naming is key to searchability as well as keeping it neat and tidy.
Example, name your album: 25-04-03-Jonny's First Birthday; add any photos related to Jonny's first birthday into this folder.
You can also make subfolders within each folder. You could make new subfolder for each day you were on vacation, for example. It’s up to you how micro you want to go with your folder system. Do what makes sense to your brain!
Now, when it's time to search for Jonny's first birthday photos, you can either search by date or by event. Easy-peasy!

Step 3: Backup Photos in Online Storage
Now that you've got your photos trimmed down and organized like a pro, it is to back them up online.
If you use Apple iCloud with your iPhone and sync your photos folder, this will automatically happen for you. Great! You’re done!
If you use a program like Google Photos or Dropbox, you’ll have to go into each of these apps and add your album folders manually. Inside of each program will be an option to automatically sync your photos, similar to iCloud, or you may choose to manually pick which images you'd like added. I highly recommend auto-sync, so it's one less thing on your plate. For more on specifics of this process, see my YouTube video.
Apple iCloud gives you 5 GB of free storage to back up your phone, phone photos and if you have Mac computers, they also share this storage. You can imagine how quickly 5 GB gets used up! Google gives you 15 GB of storage for free that must account for photos, email and any files you create in docs, sheets, etc. and any files you upload. Dropbox basic gives you 2 GB of storage for any files you’d like to keep. All of these options do not give much space for free for online storage and likely will require you to upgrade for a small fee.

Step 4: Backup Photos Offline
The last step, which is optional, (but definitely recommended!) is to backup your phone photos offline. This will provide you with a foolproof way to ensure your photos are safe by backing them up twice. Use an external hard drive as a second back up of all photos. My favorites are the Western Digital My Passport and the Sandisk Extreme Pro SSD. Get 2 TB as it's enough room to store all your photos for years.
The easiest way to do this is to download photos straight from your online storage to your computer. Find the downloaded images in the Downloads folder on your computer. From there, you can load them onto the external hard drive. Once they are loaded, you can delete them from the downloads folder, since you have them backed up online and on an external hard drive. Don't forget to delete them off your computer, or you risk slowing down your computer's performance and taking up all of it's storage!
Congratulations, you’ve done it!
Carve out a few hours on a free day or split your time between a few days and complete the 4 steps to backup phone photos. Pat yourself on the back! If you want to tackle backing up your professional family or wedding photos, you’ll want to watch my video on that next, or see the blog post linked below.
Read this next!

EMERALD RUE, FAMILY FILMS & PHOTOGRAPHS | [email protected]
Copyright 2025 Jennifer Martodam Creative, LLC
