BLOG

5 Photography Phone Tips
5 Photography Phone Tips
Wouldn’t having a professional photographer follow you around to document your family’s big moments would be great? Perhaps that’s your worst nightmare....(ha!) Either way, it’s not economical to hire your own paparazzi. Luckily, most of us carry a pretty darn good camera in our pockets. These five photography phone tips and some practice will have you documenting those everyday moments in no time!
Here are my top 5 Tips & Tricks for Better, Brighter Phone Pictures of Your Children. Want more? Get a series of three PDFs, The Basics, Composition, and Editing Apps with extended tips, by subscribing to my email list. I promise not to spam you. You can unsubscribe anytime.

Tip #1: Know the iPhone Camera Hacks!
Access Camera: Swipe your lock screen right to left to access your camera quickly.
Simple Selfies: The shutter is also triggered by the + volume button on the side of the phone. This trick also works on wired ear-buds, if you have them plugged in.
*Set a Timer: The tiny clock in the upper right will allow you to set a timer. This will helping keep images sharp by avoiding camera shake.
*Focus: Tap the screen where your main subject is to focus. Hold the screen to lock focus.
*Adjust Exposure: Focus, then drag your finger up and down over the little sun to the right of the focus box.
*Always wipe the lens BEFORE you begin!
Tip #2: Just Say No! (To Flash)
If possible, avoid the flash! Natural light will give your images better contrast and color. And let’s not even start on red eye!
More light is needed if the images are blurry. The shutter has to slow down to let more light in, thus capturing any motion. Even moving just a few feet closer to a window can make a huge difference. Open up the curtains & blinds and let the light shine!
Tip #3: Rule of Thirds
It may be the 21st Century, but tradition has something to teach. Photography 101 tells us that Rule of Thirds is an excellent guideline to interesting photos. See what I did there?!
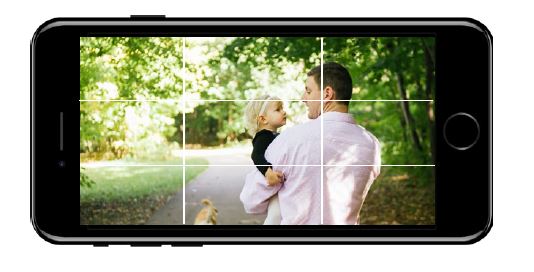
Think of mentally dividing the frame into an equal grid of 9 boxes. When you align your subject along the intersecting lines, it’s very pleasing to the eye!
Lucky for you, there’s no need to eyeball it! For iPhone and Android, go to your phones settings, select Photos & Camera, and turn on the Grid function.

Tip #4: A Different Perspective
Standing and using your camera at body height rarely results in interesting images. I often kneel or lay on the floor when photographing kids. Shoot from straight above your children or farther away to include what’s happening in the foreground or background.
Forget about the entire body needing to be in the frame or take photos of just hands or feet. Break the rules! Photography is art, not science, people!

Tip #5: Use an App to Edit Like a Pro!
Snapseed is powerful, yet easy to use. It’s got all the basics - crop, straighten, sharpen, exposure, and more - but also has advanced editing tools. There’s even a healing tool for removing unwanted objects!
It offers a range of filters, textures, blur effects and more! It can really enhance the mood of your photo. There are so many features, you may want to investigate them further via THIS ARTICLE!
Now, here's your homework (I'm a former teacher, you knew there'd be homework!). Download the full series of tips and tricks by subscribing to my newsletter above. Practice! When posting on social media, use the hashtag #emeraldruetips so I can see your progress and give your photos some love! Happy capturing!
Ready for more?

Travel Photography Tips Plus My Recommendations for a Camera
EMERALD RUE, FAMILY FILMS & PHOTOGRAPHS | [email protected]
Copyright 2025 Jennifer Martodam Creative, LLC
